
A few small changes can make any backyard more comfortable and inviting. Simple weekend projects can help people enjoy their outdoor space more and use it in new ways. From a fresh patio to a cozy fire pit, each project brings a new feature to the yard.
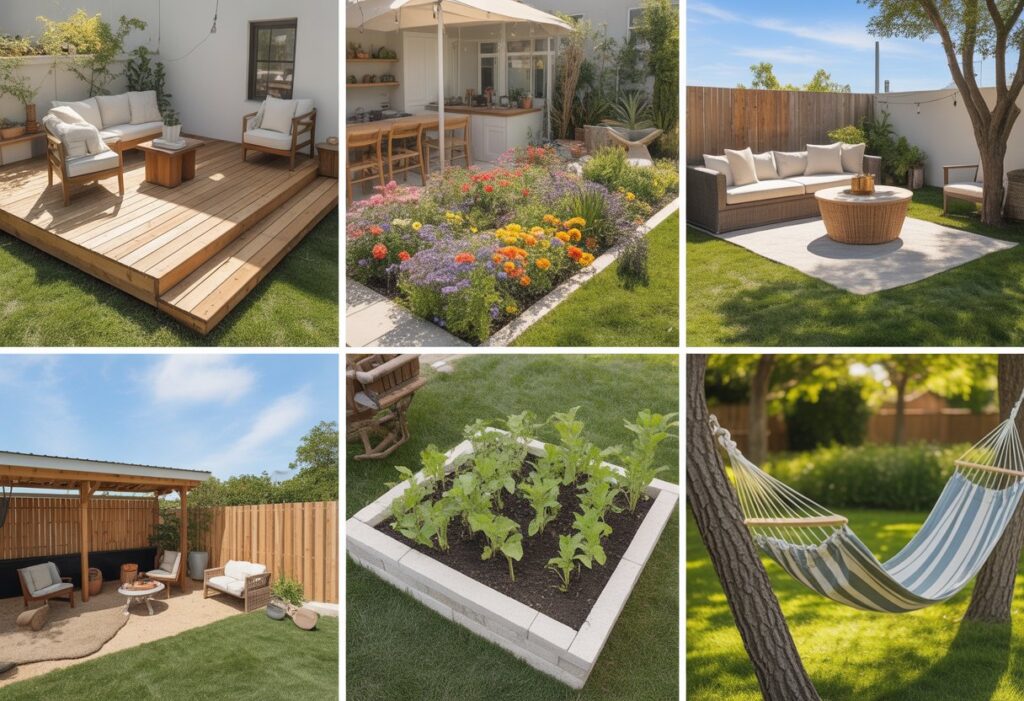
Anyone can try these ideas, whether they have a large yard or just a small patio. These projects are simple enough to finish in a weekend, but they will last for many seasons.
Key Takeaways
- Weekend projects can improve outdoor spaces quickly.
- Practical updates create areas to relax and enjoy nature.
- Even small projects can make a big difference in how a yard feels.
Weekend Outdoor Project Comparison
If you want to upgrade your backyard quickly, these five weekend projects offer different benefits depending on your budget, available space, and how much DIY work you want to take on.
| Project | Typical Budget | Time Needed | Difficulty | Best For |
|---|---|---|---|---|
| Patio Lounge Area | $300–$1,500 | 1–2 weekends | Intermediate | Relaxing seating and entertaining |
| Vertical Garden | $100–$500 | 1 weekend | Beginner | Small yards, patios, and balconies |
| DIY Fire Pit | $200–$800 | 1 weekend | Intermediate | Backyard gathering spaces |
| Simple Water Feature | $150–$700 | 1 weekend | Beginner to Intermediate | Creating a calm focal point |
| Outdoor Dining Area | $250–$1,200 | 1 weekend | Beginner | Outdoor meals and family use |
Tip: If you are choosing between projects, start with the one that solves your biggest outdoor problem first, whether that is seating, shade, storage, or visual impact.
How to Choose the Right Weekend Outdoor Project
The best backyard project depends on how you want to use the space. If you need a place to relax, a patio lounge area may give you the biggest daily improvement. If your yard is small, a vertical garden can add color and privacy without taking up much room. If you want to make the space feel more social, a fire pit or dining area may have the biggest impact.
Before starting, think about your budget, available time, maintenance preferences, and how often the finished space will actually be used. The most successful weekend projects are usually the ones that solve a real everyday need.
Weekend Project 1: Build a Stylish Patio Lounge
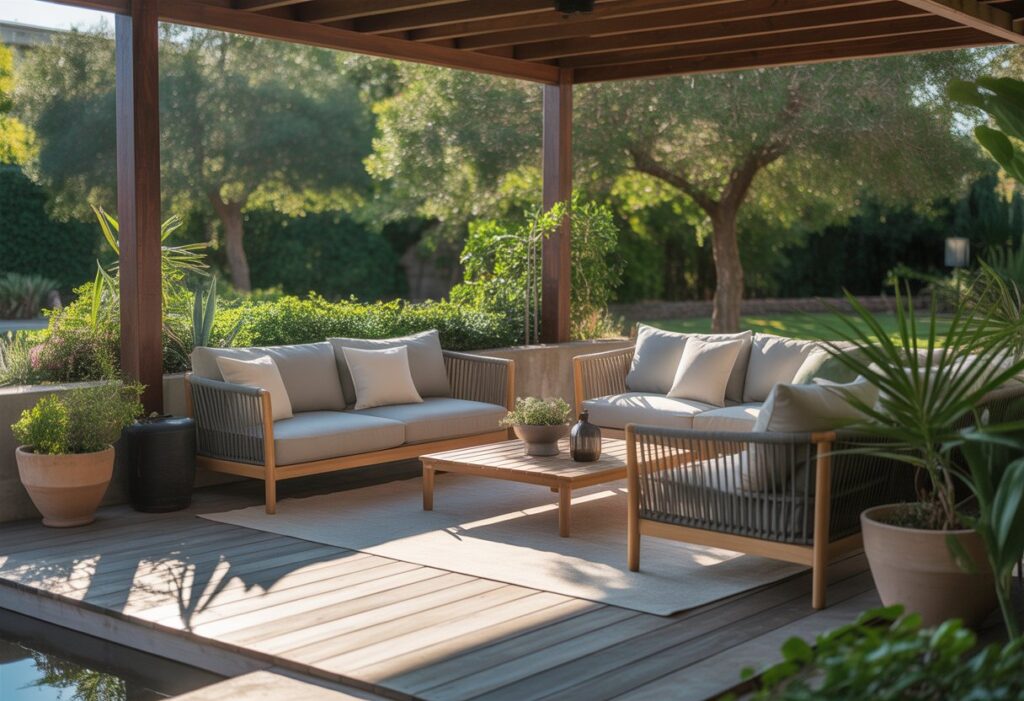
A well-built patio lounge extends the living space outdoors and gives people a comfortable spot to relax or host guests. Picking strong materials, building a solid base, and using the right lighting can make the lounge both inviting and long-lasting.
Project Overview
- Difficulty: Intermediate
- Time: 1–2 weekends
- Cost: $300–$1,500
- Best For: Creating a comfortable seating area for relaxing or entertaining
- Key Materials: Pavers, gravel base, seating, outdoor cushions, lighting
Choosing the Right Materials for Comfort and Durability
Materials make a big difference in how a patio lounge looks and feels. For the flooring, popular choices include concrete pavers, natural stone, or composite decking. Each offers good durability against weather and foot traffic.
Table: Common Patio Materials
| Material | Pros | Cons |
|---|---|---|
| Concrete Pavers | Easy to install, cheap | Can crack over time |
| Natural Stone | Looks high-end, lasts | Expensive |
| Composite Decking | Low maintenance | Can get hot in sun |
For lounge furniture, look for wicker, teak, or powder-coated metal. Cushions should be water-resistant and UV-protected so they do not fade or get damaged by rain. Using outdoor rugs adds extra comfort and color while still standing up to sun and moisture.
Step-by-Step Patio Construction Guide
Start by measuring the area for the lounge. Mark the boundaries with stakes and string. Clear grass and debris from the area before leveling the ground.
Lay down a layer of gravel for drainage, then compact it well. Place sand over the gravel to create a flat surface. Arrange the pavers or stones one by one, fitting them close together.
Tap them into place using a rubber mallet. Fill spaces between stones with sand or fine gravel to prevent shifting. For a wooden or composite deck, use a ground-level frame and screw the boards tightly into position.
Finish by sweeping the area and checking for loose parts. Place outdoor furniture in a way that leaves enough room to walk and relax without feeling crowded.
Adding Outdoor Lighting for Evening Ambiance
Lighting keeps the patio useful after sunset and makes it feel welcoming. String lights are simple to hang along railings or over the lounge area, and solar-powered lanterns can be set along paths or on tabletops.
For added safety, install low-voltage path lights around the edge of the lounge. Use LED spotlights to highlight plants or design features. Wall-mounted or fence lights can give soft, even light.
Choosing warm-colored bulbs helps create a calm, cozy mood. Dimmer switches or smart plugs make it easy to control the brightness. Proper wiring and weatherproof fixtures reduce the risk of accidents when it rains.
Common Patio Lounge Mistakes to Avoid
One of the biggest mistakes is building the seating area without thinking about drainage, furniture layout, or sun exposure. A patio lounge may look good at first but feel uncomfortable if it gets too hot in the afternoon or stays damp after rain.
It also helps to measure furniture before finalizing the patio size. Many DIY patios end up feeling cramped because the walkway space around chairs and tables was not planned properly.
Weekend Project 2: Create a Vertical Garden Retreat
Vertical gardens save space and bring more greenery to patios or balconies. They are a creative way to showcase plants, add privacy, and brighten up walls.
Project Overview
- Difficulty: Beginner
- Time: 1 weekend
- Cost: $100–$500
- Best For: Small spaces and adding greenery without using much ground area
- Key Materials: Wall planters, trellis, mounting hardware, potting mix, plants
Selecting the Best Plants for Vertical Gardens
The right plants are key to a successful vertical garden. Shallow-rooted plants such as herbs, ferns, succulents, and pothos are popular choices because they do not need deep soil. These plants also tend to be hardy and require less care.
For sunny spots, choose spider plants, jade, or petunias. In shadier areas, go for ferns, pothos, or English ivy.
Use the table below to help match plant choices to your conditions:
| Sunlight | Suitable Plants |
|---|---|
| Full Sun | Petunias, Jade, Sedum |
| Shade | Ferns, Pothos, English Ivy |
| Mixed | Spider Plant, Peperomia |
It’s smart to mix a few types for color and texture. Always pick plants that grow well together and fit your climate.
DIY Frame and Mounting Options
Frames can be made from wood, plastic, or even old pallets. Many people use hanging shoe organizers or pocket panels made for gardens. For stronger, larger gardens, a wooden frame with landscape fabric is common.
Wall location matters. Choose walls that get the right amount of sun and avoid places where water might drip or pool. Always use hardware that can hold wet soil safely. For renters, free-standing frames that lean against a wall avoid damage.
Popular mounting options include:
- Wall-mounted panels: Directly attached to exterior walls.
- Freestanding frames: Great for patios or renters.
- Hanging organizers: Simple and good for herbs or smaller plants.
A waterproof layer on the back keeps walls dry. Secure all mounts to handle the weight, especially after watering.
Maintaining a Healthy Vertical Garden
Watering is the most important part. Vertical gardens tend to dry out faster, especially at the top level. Using drip irrigation or self-watering containers keeps moisture even.
Fertilize every few weeks with a balanced, water-soluble fertilizer. Trim plants often so they don’t crowd each other or block sunlight.
Check weekly for signs of pests or yellow leaves. Remove any sick plants to protect the rest. If the garden is indoors or on a shaded patio, turn or rotate the frame sometimes to keep all plants healthy.
Small repairs and plant changes are easy with loose pocket or modular systems. Replace soil once a year to keep it fresh.
Common Vertical Garden Mistakes to Avoid
A common mistake is choosing plants without matching them to the wall’s sunlight conditions. Some vertical gardens struggle because the plant mix looks attractive at first but does not match the actual heat, wind, or watering conditions of the space.
Another issue is underestimating the weight of soil and containers. Make sure the wall, trellis, or mounting system can support the finished load safely.
Weekend Project 3: Install a Fire Pit Gathering Area

A fire pit creates a cozy spot for evening relaxation and roasting marshmallows. Careful planning, safety steps, and the right seating make it a worthwhile upgrade for any yard.
Project Overview
- Difficulty: Intermediate
- Time: 1 weekend
- Cost: $200–$800
- Best For: Backyard gatherings and cooler evenings outdoors
- Key Materials: Fire pit blocks, gravel, paver base, steel insert, level
Important Fire Pit Safety Considerations
Before building a backyard fire pit, check local fire codes, HOA rules, and manufacturer guidance for clearance requirements, approved materials, and seasonal burn restrictions. Fire pit regulations vary by location, and some areas limit open flame features during dry or windy conditions.
- Keep the fire pit well away from fences, structures, low tree branches, and other combustible materials
- Place the fire pit on a stable, non-flammable surface
- Use materials rated for high heat exposure
- Keep a hose, bucket of water, or fire extinguisher nearby
- Never leave a fire unattended, even for a short time
- Clearance requirements vary by location, fire pit type, and local code, so always verify the required distance from buildings, fences, trees, and other combustible materials before installation.
For gas fire pit kits or inserts, always follow the manufacturer’s installation instructions and local code requirements.
Tools and Materials Needed for Fire Pit Construction
Most backyard fire pits are made from concrete pavers, retaining wall blocks, or fire bricks, which can handle high heat. Choose blocks that are rated for outdoor fires. A metal fire ring adds protection and keeps the walls from cracking.
Basic tools needed:
- Shovel
- Level
- Tape measure
- Rubber mallet
- Steel rake
Materials list:
| Material | Amount (Typical) |
|---|---|
| Concrete blocks | 30-40 pieces |
| Gravel | 3-5 bags |
| Sand | 2-3 bags |
| Fire ring (metal) | 1 (optional) |
A clear step-by-step plan can help: mark the circle, dig a shallow trench, lay a gravel base, and stack the blocks. If using adhesive, let it dry fully before lighting a fire.
Incorporating Seating Around Your Fire Pit
Seating is important for comfort and safety. Built-in benches, simple wooden Adirondack chairs, or even large stones can work well. Place seats far enough to avoid getting too close to the heat, but close enough for comfort—about 3-4 feet from the edge is a good rule.
Arrange seating in a circle for easy conversation. Make sure there is enough space to walk between chairs and the fire. Weatherproof cushions and sturdy chairs can handle outdoor elements. Some people add small side tables for drinks or snacks.
For added safety, avoid using plastic or fabric seats that can melt or catch fire. Choose non-flammable materials like stone, metal, or treated wood for the best results.
Common DIY Fire Pit Mistakes to Avoid
The most common fire pit problems come from poor placement and using the wrong materials. Building too close to structures or using blocks not designed for heat can shorten the life of the project and create safety issues.
It is also important to keep the seating area around the fire pit comfortable and functional. Leave enough room for chairs, foot traffic, and safe movement around the fire feature.
Weekend Project 4: Design a Refreshing Water Feature
Adding a water feature can bring relaxing sounds and a new focal point to any outdoor area. Homeowners can pick from different types, sizes, and placements to fit both small gardens and large yards.
Project Overview
- Difficulty: Beginner to Intermediate
- Time: 1 weekend
- Cost: $150–$700
- Best For: Adding movement and a relaxing focal point to the yard
- Key Materials: Basin, pump, tubing, stones, decorative plants
Choosing the Perfect Location for Your Water Feature
Location affects how a water feature looks, sounds, and functions. It is best to place it where people can enjoy the sight and sound, like next to a patio or along a walkway. Avoid setting it too close to trees, as falling leaves will require extra cleaning.
Consider sunlight and shade. Too much sun can lead to algae growth in ponds and can heat up the water, while too much shade can slow plant growth if you choose aquatic plants. An even, level area makes installation easier and helps avoid water overflow.
Key location tips:
- Place near seating areas for relaxing sounds.
- Ensure a nearby power source for pumps.
- Avoid low spots that collect rainwater runoff.
- Make sure the feature can be seen from inside the house if possible.
Options for Ponds, Fountains, and Waterfalls
Water features come in many forms. Small spaces may suit a simple bubbler fountain or a ceramic urn fountain. Larger spaces allow for small ponds or flowing waterfalls. Fountains are easy to install and maintain, since they usually require only a small pump and water basin.
Ponds can support aquatic plants and even small fish, but need a liner, pump, and careful placement. Waterfalls need a slope or raised area and work well when combined with either a pond or a rock bed for recirculating water.
| Type | Space Needed | Maintenance | Setup Difficulty |
|---|---|---|---|
| Fountain | Small | Low | Easy |
| Pond | Medium/Large | Moderate/High | Moderate |
| Waterfall | Medium/Large | Moderate | Moderate/Hard |
Integrating Natural Stones and Greenery
Natural stones add texture, shape, and help blend the water feature with the landscape. Smooth river rocks, slate, and boulders can border a pond or hide the edge of a fountain basin. Place flat stones around the water for stepping areas or as decorative accents.
Adding plants such as water lilies, ferns, or grasses softens the look and attracts birds and insects. Plants help filter the water and keep the surroundings cool. For easy care, group low-maintenance plants that need consistent moisture near the edge.
Consider these options for a natural look:
- Mix large and small stones for variety.
- Use native plants suited to damp soil.
- Add mulch to keep soil moist around plantings.
Common Water Feature Mistakes to Avoid
Many simple water features fail because the basin is not level or the pump size does not match the design. Even a small imbalance can make the feature look uneven or cause water loss over time.
It also helps to place the feature where it can be seen and heard easily from a seating area or window. Good placement usually matters more than size.
Weekend Project 5: Construct a Functional Outdoor Dining Space
An outdoor dining space allows friends and family to gather comfortably outside. The main focus is on a sturdy dining set and using materials that endure the weather.
Project Overview
- Difficulty: Beginner
- Time: 1 weekend
- Cost: $250–$1,200
- Best For: Outdoor meals, entertaining, and family use
- Key Materials: Table, chairs, outdoor rug, lighting, shade solution
Building a Durable Outdoor Table and Benches
A strong, lasting outdoor table and benches start with the right materials. Many people choose pressure-treated lumber, cedar, or composite wood, as these hold up well outdoors. It helps to use galvanized screws and bolts because they resist rust. Table and bench plans are found online or at home improvement stores.
Key steps:
- Measure the area where the set will go.
- Cut wood accurately using quality tools.
- Sand edges to avoid splinters.
- Assemble with care, keeping angles square for stability.
Make sure the surface is smooth and level, especially if children will use the furniture. Extra supports under the table help keep it from wobbling. Simple designs, like a classic picnic table, work well and are comfortable for most groups.
Weatherproofing Your Outdoor Dining Area
Protecting the dining space from sun, rain, and wind increases its lifespan. Deck stains or outdoor sealers help wood resist moisture and UV rays. For composite materials, regular cleaning usually keeps them looking new.
Consider adding these items:
| Feature | Purpose |
|---|---|
| Shade Umbrella | Blocks sunlight and keeps area cooler |
| Outdoor Rug | Adds comfort and protects flooring |
| Cover or Tarp | Shields furniture from rain |
Check that cushions and fabrics are marked “weather-resistant.” Store them inside or in a waterproof box when not in use. Trim back trees or bushes to keep the dining area open and easy to clean. Regular upkeep, like tightening screws or brushing away leaves, helps everything last longer.
Common Outdoor Dining Area Mistakes to Avoid
A common mistake is focusing only on the table and chairs while overlooking comfort features like shade, lighting, and circulation space. A dining area works better when people can move around easily and stay comfortable during different times of day.
It is also smart to choose weather-resistant materials that are easy to clean and store. Low-maintenance furniture usually gets used more often in everyday life.
Finishing Touches for Outdoor Transformation
Small details like planters, lights, and seasonal accessories can make an outdoor space feel welcoming and complete. Using regular upkeep helps these touches last and keeps the yard looking neat.
Incorporating Decorative Accents and Accessories
Adding decorative accents brings color, texture, and personality outside. Outdoor cushions and pillows give benches or chairs extra comfort and can be changed based on the season. Planters filled with flowers or herbs work well by entryways or along pathways.
Pathway lights or string lights create a cozy feeling in the evening. A simple outdoor rug under a table can define a seating area. Statues, wind chimes, or bird feeders add accents that reflect personal taste.
Here are a few accessories to consider:
- Solar lanterns for soft night lighting
- Weatherproof pillows and cushions
- Potted plants in different sizes and colors
- Outdoor rugs for comfort
- Garden art, such as sculptures or stepping stones
Regular Upkeep to Maintain Fresh Appeal
Keeping the area clean and well-cared for protects the new look. She or he should sweep up leaves, dust outdoor furniture, and prune plants regularly. This stops things from looking messy and helps prevent damage.
Wash cushions and rugs as needed, following the care instructions. Check solar lights to see if they work and replace batteries if needed. Pick up any clutter quickly, like garden tools or toys, to keep pathways clear.
A short weekly checklist can help stay on top of maintenance:
| Task | How Often |
|---|---|
| Sweep patios and decks | Weekly |
| Wipe furniture | Weekly |
| Water plants | As needed |
| Wash textiles | Monthly |
| Check lights | Monthly |
Sticking to a routine keeps outdoor spaces looking inviting and cared for all season.
About the Author
Kate specializes in DIY landscaping, backyard improvement projects, and practical outdoor design ideas for homeowners. Her work focuses on helping readers create outdoor spaces that are more functional, attractive, and easier to enjoy without taking on overly complicated renovations.
She writes beginner-friendly guides on patios, walkways, garden layouts, planting ideas, outdoor living spaces, and low-maintenance landscape improvements. Her content is designed to help homeowners make realistic upgrades using accessible materials, simple planning, and practical step-by-step decisions.
At Yard Utopia, Kate shares ideas for turning ordinary yards into more usable and inviting spaces through thoughtful DIY outdoor projects.
Frequently Asked Questions
Homeowners can update their outdoor spaces over a weekend by focusing on simple projects such as seating, budget-friendly décor, and fast landscaping ideas. Adding instant color with the right plants or using easy lighting upgrades can make backyards feel more inviting.
What are some budget-friendly DIY projects to enhance my backyard?
Painting old furniture, making a pallet garden, or adding a stone pathway are cost-effective options. Solar lights, simple planters, and homemade bird feeders can also add charm without much expense.
How can I build a simple outdoor seating area over the weekend?
Use weather-resistant materials like treated wood or concrete blocks. Stack blocks to make a bench or use pallets for a platform. Add outdoor cushions or blankets for comfort.
What landscaping changes can I make in two days to improve my garden?
Mulch garden beds to give them a neat look. Plant a border of flowers or line a path with small shrubs. Removing weeds and trimming bushes can also make a big difference fast.
Can you recommend quick outdoor lighting solutions to elevate my patio?
String lights are simple to hang between trees or posts. Solar-powered garden lights work well and do not need wiring. Stick-up LED spotlights can brighten up dark corners.
How do I create a small water feature in my outdoor space by myself?
A tabletop fountain kit can be set up in an hour. For a bigger option, use a large ceramic pot, a small pump, and some stones to build a bubbling water feature.
What are the best plants to add instant vibrancy to an outdoor area?
Bright annuals like marigolds, petunias, or impatiens give quick color. Ornamental grasses and potted ferns can fill empty spaces fast. Consider adding herbs like basil or mint for both greenery and useful leaves.