
Installing a walkway yourself can make your yard look better and create a useful path where you need it most. DIY walkway installation is a practical project that many homeowners can finish with just a few basic steps and simple tools. Doing the work yourself gives you control over the design, saves money, and lets you choose materials that fit your style.
Installation Standards & Safety Notes
This guide follows common hardscape installation practices used for residential pedestrian walkways. Base depth, drainage slope, and compaction requirements may vary depending on soil conditions, climate, and paver manufacturer specifications.
- Recommended drainage slope: approximately 1/4 inch per foot away from structures
- Compaction should occur in multiple layers for long-term stability
- When cutting pavers, wear eye protection and a dust mask to reduce silica exposure
Always review local building codes and manufacturer installation recommendations before starting your project.
Project Overview
- Difficulty: Intermediate
- Time: 1 to 2 weekends (depending on length)
- Cost: $5 to $15 per square foot
- Key Tool: Plate compactor (highly recommended for a level finish)
Many people want to know exactly how to plan, prep, and build a sturdy and attractive walkway without hiring a professional. This guide will break down the process into simple steps, from choosing the right materials to adding the final touches so the walkway lasts for years.
Key Takeaways
- Careful planning and basic tools help make DIY walkways simple.
- Site preparation and proper installation steps are key for a solid path.
- Simple upkeep keeps your finished walkway looking great.
Planning Your DIY Walkway
Careful planning helps to avoid mistakes and saves time later. The right choices for walkway placement, materials, and layout make sure the path is strong and fits the yard.
Choosing the Right Walkway Location
A walkway should connect key areas, such as the front door, driveway, garden, or patio. It is important to pick a route that is direct and avoids sharp turns or steep slopes. Flat, even ground is easier to build on and reduces the risk of water puddles or erosion.
Tree roots, underground pipes, or cables should be marked before digging. Placing the walkway near flower beds or lawns can highlight landscaping. Homeowners should check that the walkway leaves enough space for mowing and other yard work.
There should be at least 3 feet of width for a single-person path. Wider walkways work better for side-by-side walking or moving garden equipment.
Determining Materials and Tools Needed
Different materials work for different needs and budgets. Common choices include concrete pavers, stone, gravel, brick, and poured concrete. Heavier materials last longer but need a solid base. Gravel is easier to install but shifts over time and may need borders.
Estimated Materials & Cost Breakdown
| Material | Estimated Quantity | Typical Cost Range |
|---|---|---|
| Pavers | Based on walkway square footage | $3–$15 per sq. ft. |
| Gravel Base | 3–4 inches deep | $40–$80 per ton |
| Bedding Sand | 1 inch deep | $30–$60 per ton |
| Polymeric Sand | 1–2 bags average | $25–$50 |
| Edging Materials | Perimeter length dependent | $1–$3 per linear foot |
Total DIY walkway installation costs typically range from $500–$2,000 depending on walkway size, material selection, and tool rental needs.
A basic tool list includes:
- Shovel
- Tape measure
- Stakes and string
- Level
- Rubber mallet
- Wheelbarrow
- Sand or gravel for the base
Some materials need extra tools, like a plate compactor for crushed stone or brick saw for cutting bricks. Protective gloves and eye protection are important for safety.
Safety Gear:
- Work gloves (to prevent blisters from stone handling)
- Knee pads (essential for the laying phase)
- Dust mask (especially if you are cutting pavers to avoid inhaling silica dust)
The “Rent vs. Buy” Tip: While a hand tamper works for small paths, renting a motorized plate compactor from a local hardware store is the secret to a walkway that doesn’t settle unevenly after the first rain.
Design Considerations and Layout
Good walkway design matches the home’s style and fits existing landscaping. Curved paths look more natural in gardens, while straight lines are common for modern or formal spaces.
It helps to sketch the layout on paper first, then mark it on the ground using stakes and string. Consistent width and gentle curves make walking easy and safe.
Tables or diagrams can show possible patterns, like herringbone, running bond, or basket weave for bricks. Mixing colors or shapes adds interest but should not make the path harder to build. Drainage is important—make sure the path slopes slightly away from structures to prevent water problems.
Preparing the Site
A smooth, sturdy walkway depends on good site preparation. Accurate measuring, even ground, and strong edges help prevent shifting and future damage.
Marking and Measuring the Walkway Area
Start by measuring the length and width of the path using a tape measure. Mark the area using stakes and string, or use landscaping paint to draw the walkway outline. This ensures the walkway follows straight lines or curves as planned.
Double-check all measurements to avoid mistakes. Make sure the width fits comfortably for walking, generally at least 2–3 feet wide. Clearly marked edges make the next steps easier and help visualize the walkway in the yard.
Tips:
- Use a long, straight board as a guide for straight sections
- For curves, use a flexible garden hose to lay out the shape before marking
- Take time to check that both ends of the walkway line up with doorways or other entrances
Pro-Tip: Use a garden hose to mock up curved paths. It is much easier to adjust than string or spray paint, and it helps you visualize the flow of the yard before you dig.
Excavating and Leveling the Ground
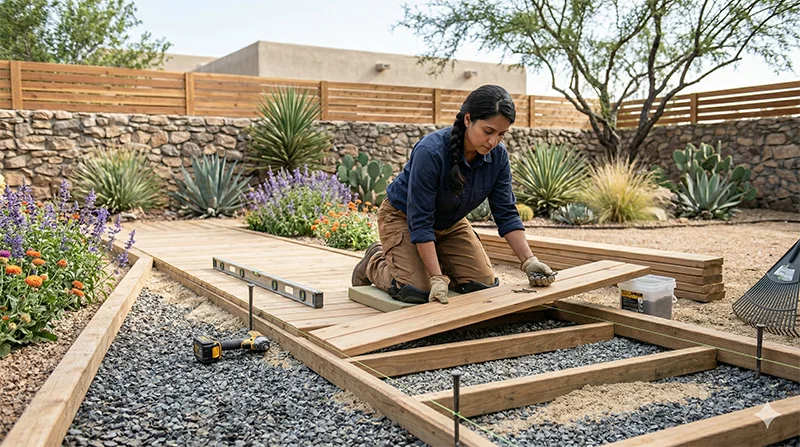
Excavate the marked walkway area by removing grass, plants, and topsoil. For most paver walkways, plan for a total excavation depth of about 7–9 inches, which allows room for 3–4 inches of compacted gravel base, 1 inch of bedding sand, and the thickness of the paver. Gravel-only paths may need less depth depending on the material and border system used.
After removing soil, check the ground for rocks or roots. Remove any debris to create a flat base. Use a shovel or garden rake to level the bottom of the trench. For best results, use a hand tamper or plate compactor to pack the soil firmly.
Leveling checklist:
- The bottom should be even, with no high or low spots
- Slopes should direct water away from buildings
- Measure depth in several spots to check for consistency
Technical Detail: Ensure you maintain a “1/4-inch drop per linear foot” away from your home’s foundation. This prevents water from pooling against your house or under the pavers, which causes shifting over time.
Installing Edging for Support
Lay edging along both sides of the walkway trench. Edging keeps the walkway stable and prevents materials from spreading. Plastic, metal, and stone are common edging materials.
Secure the edging with stakes or spikes, following the manufacturer’s instructions. Check that the edging is straight and level, using a carpenter’s level if needed. Firmly packed soil or gravel against the outer side of the edging adds support.
Remember:
- Tall or wide edging may be needed for loose materials like gravel
- Keep edging slightly higher than the finished walkway surface
- Avoid gaps between the edging and ground to keep everything in place
Common DIY Mistakes to Avoid
One of the most common walkway failures comes from insufficient base compaction. Many DIY installers compact only the surface layer, which can lead to settling and uneven pavers within the first year.
Another frequent issue is poor drainage planning. If the walkway does not maintain a slight slope away from structures, water can pool beneath the pavers and create shifting during freeze-thaw cycles.
Clay-heavy soils may require additional gravel depth for stability and drainage performance.
Installing the Walkway
Creating a walkway involves careful steps. A stable base, proper placement of stones or bricks, filling gaps, and planning for drainage are all important parts.
Laying the Base and Foundation
The base helps keep the walkway level and sturdy. To start, dig out the path to the full planned depth, usually about 7–9 inches for a paver walkway. Use a tape measure to check that the depth stays consistent along the entire path.
Spread landscape fabric to stop weed growth. Next, pour about 3–4 inches of crushed gravel or stone dust into the trench. Level the base with a rake and use a tamper or plate compactor to make it firm.
After compacting, add a 1-inch layer of sand on top. Smooth the sand with a board or level. Make sure the surface is flat but slightly slopes away from any buildings.
Checklist:
- Dig path 4–6 inches deep
- Add landscape fabric
- Spread 3-4 inches of gravel or stone dust
- Compact the base
- Add and smooth 1 inch of sand
Pro-Tip: Do not use “all-purpose sand” for the base. Use “concrete sand” or “screeding sand.” The angular grains lock together better than the rounded grains of play sand, providing a more stable foundation.
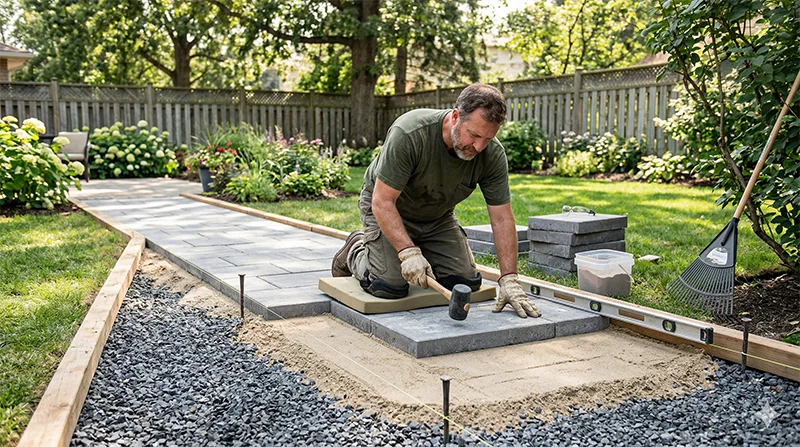
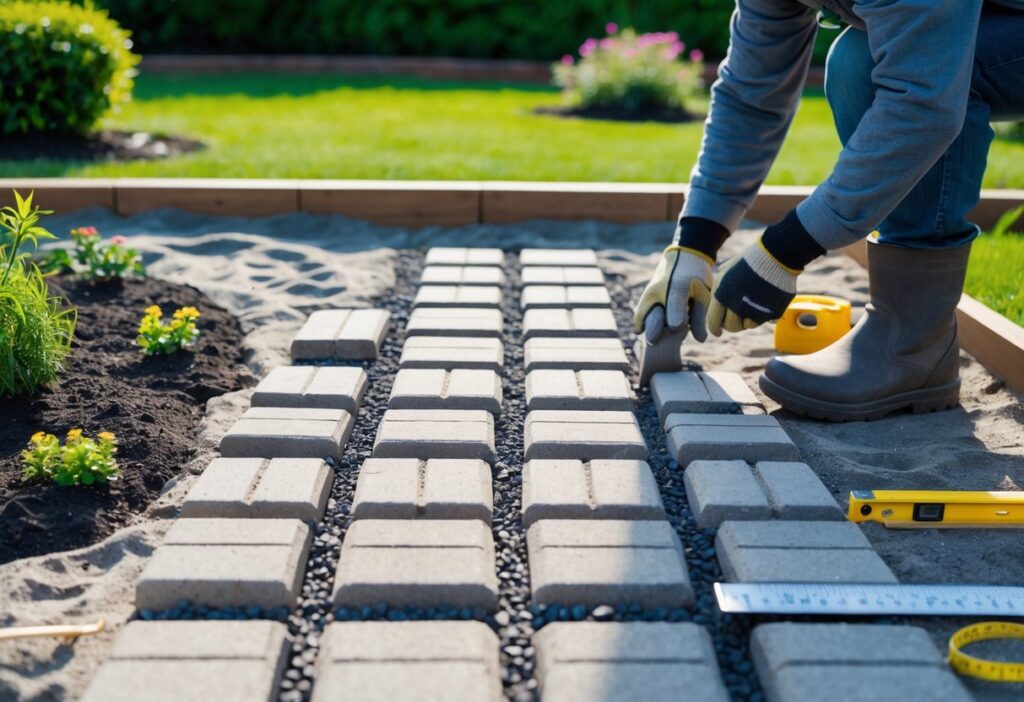
Placing Stones, Pavers, or Bricks
Lay the first stone, paver, or brick at one end of the path. Set each piece down carefully in the sand base. Press each piece down so it sits flat and matches the height of the others.
Keep the gaps even by using plastic spacers or leaving a small space, often about 1/8 to 1/4 inch. Use a rubber mallet to tap the stones or bricks, making sure they are snug and steady.
Check the level often. Adjust the amount of sand underneath each stone as you go. If making corners or curves, cut the stones with a masonry saw or chisel.
Tips:
- Start from a straight edge
- Use spacers for even gaps
- Tap pieces gently into place
- Adjust sand to keep the surface level
Filling Gaps and Securing Materials
Once all stones, pavers, or bricks are set, fill gaps with sand, polymeric sand, or gravel. Pour or sweep sand over the path, using a broom to work it into the spaces.
Mist the path lightly with water to help the sand settle. Sometimes, it may be necessary to repeat this process a few times, especially if the sand keeps sinking.
For wider gaps between stones, small gravel or pebbles can be used instead of sand. Polymeric sand hardens after watering and helps lock the materials in place.
Materials for Filling Gaps:
| Gap Width | Recommended Filler |
|---|---|
| Under 1/4 in | Polymeric or joint sand |
| Over 1/4 in | Small gravel or pebbles |
Expert Note: I always recommend Polymeric Sand over regular sand. It contains a binding agent that hardens when misted with water, which effectively blocks weed growth and prevents ants from colonizing your path.
Ensuring Drainage and Stability
Good drainage keeps water from pooling on the walkway or washing away the base. Slope the path at least 1/4 inch per foot away from buildings or other important areas.
Check that water runs off easily by pouring small amounts on the finished path. If puddles appear, relevel the stones or adjust the slope as needed. Making sure the sand base is compacted also helps the walkway remain firm during heavy rain.
Strong edges help hold the walkway together. Install edge restraints or edging material, like plastic or metal, along both sides. Stake these down to stop shifting and keep the path neat.
Key Steps:
- Slope walkway away from buildings
- Test with water for drainage
- Compact base to reduce shifting
- Install edging for extra support
Finishing Touches and Maintenance
A well-finished walkway lasts longer and looks better with the right care. Keeping the path clean, protecting it from stains, and maintaining the space around it are important steps.
Cleaning and Sealing the Walkway
It is best to remove dirt, leaves, and debris from the walkway with a stiff broom or blower. For tough stains or grime, use a pressure washer or a mix of mild soap and water. Avoid strong chemicals, as these can damage the surface.
After cleaning, apply a sealer suited to the walkway’s material. Sealers help protect against water, stains, and fading from the sun. Apply the sealer with a roller or sprayer on dry, clean surfaces. Follow the product label for drying times and the number of coats needed.
Reapply sealant every one to three years, depending on foot traffic and local weather. Sealing not only keeps the walkway looking new but also prevents cracks and erosion.
Landscaping Along the Path
Adding plants, mulch, or small stones makes the walkway look finished and prevents weeds from taking over.
Plant low-growing shrubs or flowers along the edge. Choose varieties that do not spread too far or block the path. Place a simple border like plastic edging or metal strips, so mulch or rocks stay in place.
Keep the soil or mulch at least an inch below the edge of the walkway to avoid water runoff and dirt on the surface. Regularly pull out weeds and trim plants, so the walkway stays clear and neat.
Routine Upkeep and Repairs
Routine checks help find problems before they get worse. Walk the path and look for loose stones, cracks, or raised spots.
For loose or sunken pavers, remove them and add or adjust the base material. Then set the stones back and tap them in place. Fill any gaps with sand and sweep it in.
If cracks form in concrete or stone, use a patching compound to fix them early. Address drainage issues, such as standing water, quickly to prevent damage.
FAQ and Troubleshooting
Planning a walkway means picking the right materials, handling costs, and following step-by-step building instructions. This section gives clear answers to common questions about building a walkway at home.
What is the most cost-effective material for a DIY walkway?
Gravel is one of the cheapest choices for walkways. Concrete pavers are another budget option and can be found at many home stores. Brick can also be used if found secondhand or on sale.
How do I calculate the cost of materials needed for a walkway installation?
Measure the walkway’s length and width to find the square footage. Find out how much of each material is needed per square foot and multiply by the total area. Add up prices for pavers, sand, gravel, and edging.
What are some creative ideas for designing a paver walkway on a budget?
Mix different paver shapes or colors for a pattern using leftover or discounted pavers. Place pavers far apart with gravel or mulch between them. Use concrete molds for DIY pavers.
What steps are involved in preparing the ground before laying a walkway?
Mark the walkway’s path with stakes and strings. Remove grass, plants, and topsoil to a depth of about 4 to 6 inches. Lay and compact a base of gravel or sand before setting pavers or stones.
What is the process for installing a walkway with stepping stones?
Set stones in well-spaced intervals along the planned path. Dig holes just deep enough for each stone and place them so they are level with the ground. Fill gaps with gravel, mulch, or low plants to keep the stones stable.
Can I lay pavers directly on dirt?
No. Laying pavers on dirt will lead to an uneven surface within a few months. Soil expands and contracts with moisture. A gravel sub-base is required to provide drainage and stability.
What is the best base for a walkway on clay soil?
If you have heavy clay soil, increase your gravel base to 6 inches and consider laying down a layer of geotextile fabric (landscaping fabric) before adding your gravel. This prevents the stone from sinking into the soft clay.
How deep should a paver walkway base be?
Most residential paver walkways require a total excavation depth of approximately 7–9 inches. This typically includes 3–4 inches of compacted gravel base, 1 inch of bedding sand, and the thickness of the pavers themselves. Areas with clay soil or freeze-thaw conditions may require a deeper base for long-term stability.
About the Author
Kate specializes in DIY landscaping and residential outdoor improvement projects. She has worked on paver walkways, patio installations, garden layouts, and low-maintenance landscape design projects for homeowners seeking practical outdoor upgrades.
Her content focuses on beginner-friendly installation methods, material selection, drainage planning, and long-term durability considerations for outdoor hardscaping projects.